Hi CDK fans,
Since I have the great opportunity to help building a platform for my company unimed.de, I want to explain how it looks like. At the moment we are working on an exciting platform for efficient storage and retrieval of internal data. My main responsibility is the AWS infrastructure.
Our DevOps team wants to leverage as much as possible to AWS. We use AWS CDK to manage the resources in AWS. AWS CDK is a framework for creating and using Cloudformation Templates. You can choose between common programming languages. We decided to use TypeScript because our frontend is also written in TypeScript and offers the advantage of strong type definition without loosing much flexibility. If you want to know more about AWS CDK I recommend my other posts here in my blog like cdk-example.
The above mentioned frontend is implemented in TypeScript flavour with React. I'm planning a multi-part series about "AWS CDK Let's build a Platform" and this episode is specifically about the frontend.
React Frontend
As already mentioned our frontend is a React Browser App in TypeScript flavor. It uses the material design wherever possible. Authentication is done via Keycloak which is connected to our internal Active Directory. After entering the access data, relevant data can be searched for and new data can be added. The static app is built with npm run build in the build folder.
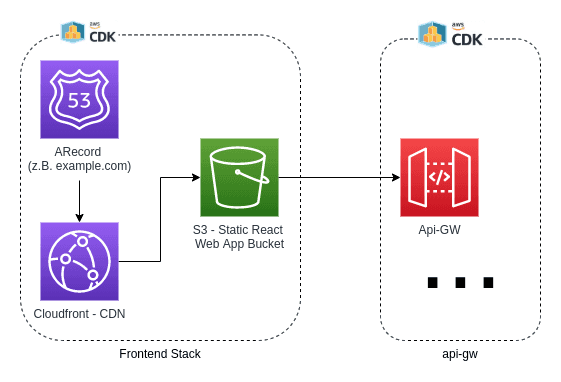
At this point I would like to make a cut and tell more about the used infrastructure. The React Browser App is a Static Web App and needs a couple of AWS resources. I will list these in the next section and how they can be managed using CDK.
CDK Stack
To display the static React App an S3 Bucket is required, which serves as a static Web App Bucket:
const bucket = new AutoDeleteBucket(this, props.domainName, {
  bucketName: `${props.subDomain}.${props.domainName}`,
  websiteIndexDocument: 'index.html',
  websiteErrorDocument: 'index.html',
  removalPolicy: core.RemovalPolicy.DESTROY,
});
I use a CDK highlevel construct called AutoDeleteBucket which can delete itself if necessary. The normal S3Bucket Construct can only delete the bucket if there is no data in it. So the AutDeleteBucket first deletes all data contained and then removes itself. This flexible behavior is useful for buckets that are only used as static Web App containers. The name of the static Web App Bucket bucketName: ${props.subDomain}.${props.domainName} is usually given after the domain e.g. example.com .
The S3 bucket stores the static build and is connected to Cloudfront:
const cloudFrontOAI = new OriginAccessIdentity(this, 'OAI', {
  comment: `OAI for ${props.domainName} website.`,
});

const cloudFrontDistProps: CloudFrontWebDistributionProps = {
  aliasConfiguration: {
      acmCertRef: props.acmCertRef,
      names: [ `${props.subDomain}.${props.domainName}` ],
      sslMethod: SSLMethod.SNI,
      securityPolicy: SecurityPolicyProtocol.TLS_V1_1_2016,
  },
  originConfigs: [
    {
      s3OriginSource: {
        s3BucketSource: bucket,
        originAccessIdentity: cloudFrontOAI,
      },
      behaviors: [{ isDefaultBehavior: true }],
    },
  ],
  errorConfigurations: [
    {
      errorCode: 404,
      errorCachingMinTtl: 60,
      responseCode: 200,
      responsePagePath: "/index.html",
    }
  ]
};

const cloudfrontDistribution = new CloudFrontWebDistribution(
  this,
  `${props.subDomain}.${props.domainName}-cfd`,
  cloudFrontDistProps
);
Cloudfront is a Cloud Distribution Network (CDN) from AWS that cascades static Web Apps all over the world in the respective regions. This keeps latency during loading to a minimum.
To load the static Web App Build into the S3 Bucket you have to create a BucketDeployment Construct:
new BucketDeployment(this, 'DeployApp-${new Date().toString()}', {
  sources: [Source.asset("../build")],
  destinationBucket: bucket,
  distribution: cloudfront distribution,
  distributionPaths: ['/'],
});
The path for invalidating the Cloudfront distribution is also specified here in the BucketDeployment. This then ensures that the cash is reloaded if a new app is deployed. The static Web App build folder contains the build of the React App and was previously created with npm run build.
Furthermore a Route 53 Record Resource is required to point a custom domain (e.g. www.example.com) to the cloudfront endpoint to make the static web app accessible via URL:
const zone = HostedZone.fromLookup(this, 'Zone', { domainName: props.domainName });
new ARecord(this, 'SiteAliasRecord', {
  recordName: `${props.subDomain}.${props.domainName}`,
  target: AddressRecordTarget.fromAlias(new CloudFrontTarget(cloudfrontDistribution)),
  zone
});
And here is the whole code:
import { StackProps, Construct } from '@aws-cdk/core';
import { AutoDeleteBucket } from '@mobileposse/auto-delete-bucket'.
import { BucketDeployment, Source } from '@aws-cdk/aws-s3-deployment';
import {
  CloudFrontWebDistribution,
  CloudFrontWebDistributionProps,
  OriginAccessIdentity,
  SSLMethod,
  SecurityPolicyProtocol
} from '@aws-cdk/aws-cloudfront';
import { ARecord, AddressRecordTarget, HostedZone } from '@aws-cdk/aws-route53';
import { CloudFrontTarget } from '@aws-cdk/aws-route53-targets';
// @ts-ignore
import codedeploy = require('@aws-cdk/aws-codedeploy');
// @ts-ignore
import lambda = require('@aws-cdk/aws-lambda');
// @ts-ignore
import core = require('@aws-cdk/core');


export interface FrontendStackProps extends StackProps {
  stage: string;
  acmCertRef: string;
  domainName: string;
  subDomain: string;
}

export class FrontendStack extends core.stack {

  constructor(scope: Construct, id: string, props: FrontendStackProps) {
    super(scope, id, props);

    const bucket = new AutoDeleteBucket(this, props.domainName, {
      bucketName: `${props.subDomain}.${props.domainName}`,
      websiteIndexDocument: 'index.html',
      websiteErrorDocument: 'index.html',
      removalPolicy: core.RemovalPolicy.DESTROY,
    });

    const cloudFrontOAI = new OriginAccessIdentity(this, 'OAI', {
      comment: `OAI for ${props.domainName} website.`,
    });

    const cloudFrontDistProps: CloudFrontWebDistributionProps = {
      aliasConfiguration: {
          acmCertRef: props.acmCertRef,
          names: [ `${props.subDomain}.${props.domainName}` ],
          sslMethod: SSLMethod.SNI,
          securityPolicy: SecurityPolicyProtocol.TLS_V1_1_2016,
      },
      originConfigs: [
        {
          s3OriginSource: {
            s3BucketSource: bucket,
            originAccessIdentity: cloudFrontOAI,
          },
          behaviors: [{ isDefaultBehavior: true }],
        },
      ],
      errorConfigurations: [
        {
          errorCode: 404,
          errorCachingMinTtl: 60,
          responseCode: 200,
          responsePagePath: "/index.html",
        }
      ]
    };

    const cloudfrontDistribution = new CloudFrontWebDistribution(
      this,
      `${props.subDomain}.${props.domainName}-cfd`,
      cloudFrontDistProps
    );

    new BucketDeployment(this, 'DeployApp-${new Date().toString()}', {
      sources: [Source.asset("../build")],
      destinationBucket: bucket,
      distribution: cloudfront distribution,
      distributionPaths: ['/'],
    });

    const zone = HostedZone.fromLookup(this, 'Zone', { domainName: props.domainName });
    new ARecord(this, 'SiteAliasRecord', {
      recordName: `${props.subDomain}.${props.domainName}`,
      target: AddressRecordTarget.fromAlias(new CloudFrontTarget(cloudfrontDistribution)),
      zone
    });
  }
}
Pipeline
We deploy the static React app via a staging pipeline. This means the app runs through the different stages Dev, QA and Prod. All stages are separate accounts. This way we achieve increased security by separating the resources. The dev account is used to test new features. The QA environment serves as the next stage.
I would like to report in more detail about our Staging Pipeline in the next part of the series.
Summary
Building a platform using AWS is exciting and fun. Having the complete infrastructure as code is extremely beneficial. It allows a sophisticated staging from e.g. a Dev environment to QA and then to Prod. Furthermore the code serves as documentation about what exactly has been and will be deployed in AWS. It is also much less error-prone than having to click everything together manually.
Here I presented the first part of my "AWS CDK Let's build a Platform" series. I explain which resources our static Web App needs in AWS and how they are managed with CDK. In the next part I will talk in more detail about our staging pipeline which is reused almost everywhere to get CDK apps through the different stages Dev, QA and Prod. I hope you liked the article and if you have any questions, just write me.
To the wonderful readers of this article I'm saying that feedback of any kind is welcome. In the future I will try to include a discussion and comment feature here. In the meantime, please feel free to send me feedback via my social media accounts such as Twitter or FaceBook. Thank you very much :).
I love to work on Content Management Open Source projects. A lot from my stuff you can already use on www.github.com/mmuller88 . If you like my work there and my blog posts, please consider supporting me on Patreon:

